Guide: DIY Window Auto-Up Mod
Date: June 5th, 2004
Cost: $1
Time: 20 minutes
Supplies
- Soldering Iron
- Solder
- 1 Diode (1N4003, 1N4005, 1N5404, or similar)
- Cutting Tool
- Flathead Screwdriver
Steps
First, remove the driver's side control piece (the part that has the mirror, door lock, and window controls). Stick a thin flathead screwdriver in at the top/front of the control piece and pop it up (you may want to put some tape on the tip to avoid scratching anything). Pull the piece out enough so you can disconnect the two connectors. You just have to push in the tabs for the connectors and slide them out, but they are over a decade old, so they could give you some trouble.

Take the control piece back to your working area. The first change will be to allow the switch to physically reach the auto-up position (it's one step farther up than the normal "hold to make it go up" position). There are two plastic tabs (ignore the middle piece) on the back (hinge-side) of the switch. If you pull back each switch, you will see that the passenger side can come up farther. Cut about 1.5mm from the tabs and try the switch again. If you hear it click, it should be good.

Photo Credit: Gianvalerio Giubilo
Next is the electronic part. Remove the plastic piece guarding the circuit board. If you hold the board just right, you can actually see that the diode position is labeled, but there is no diode there! Refer to the pictures to see where you want the diode and pay special attention to the anode/cathode orientation of the diode (a diode allows electricity to flow through it one way only). If you do not know what that means, just make sure your final product looks like the picture.
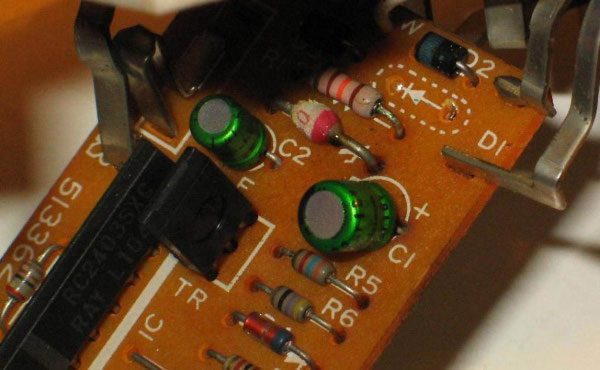
Photo Credit: Gianvalerio Giubilo
Be careful when soldering so that you do not burn the other components. You can solder the diode on the "correct" side of the board, but that is harder and does not work any better than doing it on the back-side (the easy side) as shown in the pictures.
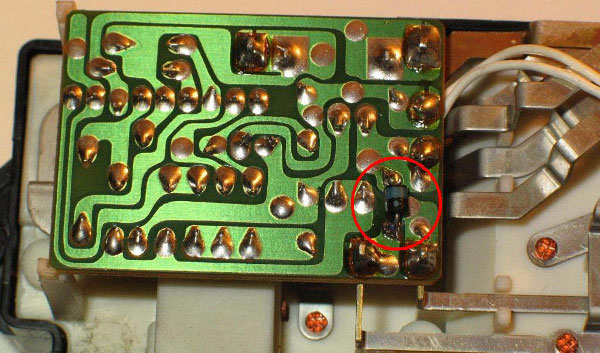
Photo Credit: Gianvalerio Giubilo
When you have the diode secured, put the plastic cover back on, rejoined the two connectors at the door panel, and pop the control piece back into place (putting the rear into place and then pushing the front back in). Turn on the car and test it out. If it works, you'll probably use it constantly, taking pride in it each time until you eventually do not even realize that you are using it. If it doesn't work... you must have done something wrong! Check to make sure the diode is facing the correct way and properly soldered. If all else fails, try asking on one of the MR2 message boards.