Guide: Silver Door Sills
Date: December 26th, 2003
Cost: $50
Time: 2 hours
Supplies
- Door Sills
- Utility Knife
- Phillips screwdriver
- Glue (optional)
Steps
First, you have to take off the stock plastic doorsills (p-sill for short). They may be attached with a Phillips screw on the footrest side and then five plastic clips underneath the length of the sill. Chances are you will break or lose a few of those plastic pieces, but it should still go on fine if you have most of them. Try to support the sill as close to each plastic piece as possible while popping it up to avoid breaking it or bending the sill excessively. The driver's side sill goes around the frunk release lever, so you may have to remove the screw holding the lever to remove the trim.
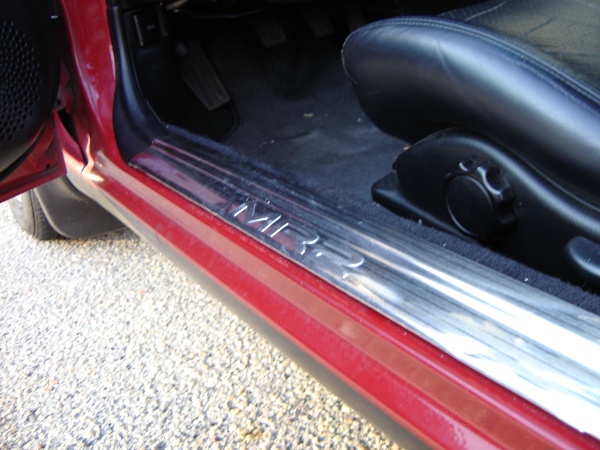
Next, you need to decide where along the sill to mount the silver doorsill (s-sill). Lay the s-sill over the p-sill and make a few marks. Be sure to line the passenger's and driver's side sills up evenly. You will notice that the s-sill does not fit. This is where you have your options: 1) modify the p-sill, 2) modify the s-sill, 3) buy a JDM p-sill, or 4) give up.
I chose to modify the p-sill, so that is where this is heading. Hooking the s-sill over the inside (closest to the seats of the car) of the p-sill (so the MR2 logo is readable from outside the car) shows you that the s-sill does not quite fit. You need to cut the underside of the p-sill where you were hooking the s-sill. Basically you have to cut a bit more than 1/8th of an inch so that the s-sill will fit properly. Be careful with the knife and go slowly! You can always remove plastic... putting it back on is a lot harder.

As you cut the plastic, continue to test fit the pieces until the s-sill lies flat on the p-sill. Now you have to cut the outside of the p-sill to get the s-sill to fit over that edge. It is a bit easier than the inside was, but be careful and take your time. You will also need to cut some of the support ribs. Warning: The plastic can become very sharp after it is trimmed.
Hopefully, the pieces fit fairly well together now, and you can make some final cuts to better their fitment. If you want, you can use glue or epoxy to finalize the process. If you do bond the pieces together, you will want to leave them clamped for at least the minimum bonding time listed on your particular epoxy/glue.
All you have to do now is stick the sills back on the car. Be sure to carefully pop each of the (remaining) plastic clips into place. You may want to take pictures of the sills because they'll soon be scuffed up by your passengers.